 By Michael Nilsson
The Powder Horn truly is the most brilliant container of all times. Naturally waterproof it has kept the powder dry for many hunters, settlers and soldiers on all continents at all times.
Horn is a natural, durable and beautiful material which also has served many other duties throughout history, and still continues to. The only hindrance is yer imagination.
With its natural cavity it only requires a few steps to transform into the mother container of all times, i.e. the Powder Horn.
Step 1. Choosing Your Horn.
Depending on what type of horn you want to create, you need to make some research. Golden age horns or horns typically associated with F&I War or American Revolution requires a smooth and whiteish surface to support scrimshawing. Cleaned, polished and scrimshaw prepared horns can be readily available from a vendor. In this particular case, we'll make a common powder horn with no scrim and fancy stuff other than a ring at neck to support the buckskin carrying strop. We therefore choose a raw, unpolished but cleaned cow horn. When choosing a horn, keep in mind that horns have a natural curve, so you would first have to determine on which side of your person the horn will be carried. The intended horn in this article is fairly straight and could be carried on either right or left side.

Step 2. Gathering Tools of Manufacture.
No special tools should have to be purchased. Use whatever you have in your garage or maybe ask a kind neighbour to lend you the desired tool.
Tape, coping saw or ordinary crosscut saw, fine and rough files, fine-grained sandpaper and/or sanding block, steelwire, drill bits, drill, sharp knife.
Step 3. Getting Rid of Excess.
If starting out with a raw horn, as in this case, you'll have to remove excess horn/raw edges from base and neck. Apply tape (to serve as a guide whilst sawing) and look at horn from different angles to see if the proportions/intended removal looks aestethically acceptable. Just remove tape and re-apply until you get/see the desired shape. Remove excess with coping saw or crosscut saw. Be aware that the crosscut saw creates rough edges, so use it with caution.
Step 4. Measuring and Drilling.
Being the most critical step in the making of a horn, drilling should be made prior to any polishing or scraping. Only reason is to rid you of time wasted should you, heaven forbid, drill through the side of the horn. Imagine having spent hours on polishing the horn and finally ending up throwing it away due to poor drilling. To determine how deep you have to drill, use the wire to measure inner cavity. Keep the wire "snug" on the top inside. Now remove wire and hold it on ouside top. Make a mark on neck. Make a mark lengthwise on 4 sides of horn from top of neck to the mark made previously. This is to be used as a guide when drilling, i.e. to, in some way, ensure straight drilling.
  
Step 5. Scraping.
Now begins the most tedious and time consuming effort of the whole project. All dents, scratches and pitting are to be removed. Use the knife and scrape the rough surface from the horn. After going over it a few times, most of the unevenness is removed. If ye feel like using the rough file, do so. These steps described are mere suggestions and should not be taken as gospel. Any further scraping and polishing will be done after the shaping/carving of neck and the base plug has been attached (I somehow felt I'd call it "base plug" instead of "butt plug" since the latter is a totally different theme).
 
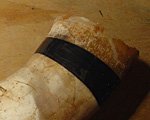
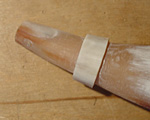
Step 6. Carving of Neck.
Once again apply tape to act as guide when deciding where to cut and shape neck. Use coping saw and cut along the outer line of tape creating a ring, then use the knife to cut away excess and file to shape neck round. Use the file to create a groove in the ring under the tape. This will hold the buckskin carrying strop. After finishing shaping the neck and ring, remove rough edges with knife/file/sandpaper.
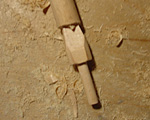
Step 7. Making the Stopper.
Ready made stoppers can be purchased, but it's quite easy constructing one yourself. In this case the most annoying wooden rod lying around in the garage came in handy. Use the coping saw/knife/file and start shaping. Later addition to stopper was a hole drilled to support the buckskin thong. Wouldn't wanna loose such a beautiful stopper when in the woods, would ya?
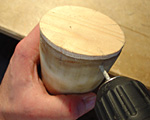
Step 8. Shaping the Base.
Most horns has an oval or strangely shaped opening of the base, so we have to in some way make it more round. This is done by lowering the base into a pot of boiling water. Let it rest for a couple of minutes to half an hour and check it regularly. Remove when pliable enough to shape. I use an ordinary plastic mug, since it's tapered and the right size enough for this horn. A wooden sizing plug will certainly do the job better, but where does one find one, when the creative itch sets in? Who has the patience to wait and spend hours purchasing the right gear when inspired? I certainly can't. I use what's readily available at home. Anyway.. Hammer the plug in place and let the horn cool off.
 
Step 9. Attaching the Base Plug.
Once cool and dry, find a piece of wood. Trace the base of horn on wood and start sawing/filing. A great deal of fitting is required. The attachment will be made using wooden plugs, which you'd have to cut and shape yourself. Using iron nails is also an option. Make marks on base of horn and wood to act as guide when drilling. Evenly spaced we drill eight holes. Hammer the plugs gently in place and start the final cutting/filing/shaping of the plug.
Step 10. Scraping and Polishing Galore.
Scrape, polish horn and base plug using knife, finegrained sandpaper or sanding block, and go at it until you're satisfied with the result.
Step 11. Ageing.
To get rid of the white and fresh colgate-feeling the horn has in this state, we decide to "age" it. It is done by fully submerging the horn into a "potion" consisting of boiling water added with onion skins. Check regularly for desired color and remove. There are many other methods in achieving a golden, antiqued color. Y'all just have to make yer own research to find the method that suits you best. This method is the only one that I've tried and it has not yet given me a reason to research other methods.
Step 12. Making a Staple.
To attach the buckskin thong to the base, we'll make use of an old brass wire. Using a vice and hammer we bend it to the shape of a staple which we gently hammer into place.

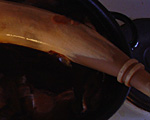
Step 13. Finished Horn.
There ye have it. Mais oui! Absolument! Trés magnifique!

Final thoughts.
Depending on yer abilities you would have to determine whether these few steps are considered minor or not. Practice perfects your skills. It's up to you to decide how much time you'd consider spending on creating your horn. There are horns available that are more or less finished, and will certainly cut down the amount of steps required considerably. Buying a completed horn is always an option but you miss out on the tears, sweat, blisters and feeling of contentment when finishing the horn. I can personally guarantee that this content feeling re-appears everytime you get the question: "Nice horn.. Made it yerself..?"..
- - - - - - - - - - - - - - - - - - - - - - - - - - - -
Bibliography/References/Suggested reading
· Accouterments I, II, III - James R. Johnston (Wonderful black and white images of golden age horns).
· Buckskinning II, Design & Construction of Powder Horns - Don Wright (Info and construction).
· Buckskinning VI, American Powder Horns - Marc Odle (Info and construction).
· Recreating the 18th Century Powder Horn - Scott & Cathy Sibley (Construction and color images of antique/repro horns. All ye need).
|